Set up a development environment
If you want to contribute to the code integrating Superset with geOrchestra:
- this happens in the "configuration" files
- but you need
- a running Superset environment, with those "config" files (first part of this page)
- a way to fake the auth system provided by geOrchestra without having to set up a full-fledged geOrchestra environment. Since the geOrchestra Gateway passes it through HTTP headers, it is quite easy and is explained at the end of this page.
Here are some instructions that should allow you to make all this happen.
Clone the georchestra superset-core repo (One-time action)
git clone https://github.com/georchestra/superset-core.git
cd superset-core
Python environment
If your system-wide version of python is not 3.11
The Superset project, relying heavily on docker, apparently made the choice to stick with a specific version of python for development, python 3.11 at the time of writing this doc. Trying to use a different version of python might prove very tricky, particularly for developement. Unfortunately, each OS will come with a system-supported version of python, and you will be lucky if the versions match. If they don't, instead of struggling with your system version of python, we recommend you make use of pyenv. Pyenv allows to manage different versions of python, side by side, and create virtualenvs from them. Windows users will want to look at pyenv-win.
Install and configure python 3.11 using pyenv
Install pyenv
# pyenv
curl -fsSL https://pyenv.run | bash
# pyenv bash setup
echo 'export PYENV_ROOT="$HOME/.pyenv"' >> ~/.bashrc
echo '[[ -d $PYENV_ROOT/bin ]] && export PATH="$PYENV_ROOT/bin:$PATH"' >> ~/.bashrc
echo 'eval "$(pyenv init - bash)"' >> ~/.bashrc
# pyenv necessary libs to install python 3.11
sudo apt-get install libncurses5 libncurses5-dev libncursesw5 \
                    liblzma-dev \
                    libsqlite3-dev \
                    libbzip3-dev \
                    libffi-dev \
                    libreadline-dev \
                    tk-dev
Install python 3.11
pyenv install 3.11.14
Create a virtualenv using pyenv and python 3.11
pyenv versions
pyenv virtualenv 3.11.14 superset-pyenv-3.11
# gets created in ~/.pyenv/versions/3.11.14/envs/superset-pyenv-3.11/
# list virtualenvs with `pyenv virtualenvs`
# activate with `pyenv activate superset-pyenv-3.11`
Install system deps packages for superset
You might need to install some packages on which Superset build will depend. The command below should match Debian Trixie (13).
sudo apt install python3-dev python3-setuptools libpq-dev \
                  libmariadb3 libmariadb-dev-compat \
                  libldap2-dev libsasl2-dev
Follow Superset installation procedure
Set up following https://superset.apache.org/docs/contributing/development#alternatives-to-docker-compose:
# Only if not using pyenv, see note above
# Create a virtual environment and activate it (recommended)
python3 -m venv venv # setup a python3 virtualenv
source venv/bin/activate

# Install external dependencies
pip install -r requirements/development.txt

# Install Superset in editable (development) mode
pip install -e .
Build python translations
pybabel compile -d superset/translations | true
Generates a lot of error messages, but this is working still (piping to true ensure a positive outcome)
or
./build-frontend.sh
builds the frontend and both translations in one go
Build javascript assets
If we don't use the docker-compose way to run superset, we need to build at least once the frontend before running Superset (or we won't get any GUI)
Warning: for the frontend, look in the docs' source code which node version is required (node v20/npm10 for superset 5)
Building the javascript static assets is in the end a bit tricky with the docker compose (I haven't yet really figured out their logic).
For dev purposes, it's simpler to build manually. If you install nvm, you can install whatever version of node is needed and compile the frontend:
# Disable SCARF analytics reporting
export SCARF_ANALYTICS=false

# Use Node 20 (code "iron")
nvm install lts/iron
nvm use lts/iron

# Install dependencies from `package-lock.json`
npm --prefix superset-frontend prune
npm --prefix superset-frontend install
npm --prefix superset-frontend run build

# Build i18n support
npm --prefix superset-frontend run build-translation
./build-frontend.sh
Config files
One-time action
You will want to use a geOrchestra-focused configuration. For this, you need to run Superset on a geOrchestra-specific configuration.
You can copy the content from https://github.com/georchestra/superset/tree/main/config/superset:
mkdir -p config
for f in superset_georchestra_config.py georchestra_custom_roles.json LocalizationFr.py GeorchestraCustomizations.py Overrides.py Preconfig.py; do
  wget -O config/$f https://raw.githubusercontent.com/georchestra/superset/refs/heads/main/config/superset/$f
done
Then you will still have to export the path to those config files at each run (see below) and tell Superset which file to use as config entrypoint (superset_georchestra_config.py).
At each run
The config files (see above) have to be found by Superset at each run. In your console, you can tell it to use these config files by setting some environment variables, see below.
# Use the geOrchestra config files
export PYTHONPATH=$PWD/config:$PYTHONPATH
# Entrypoint config file
export SUPERSET_CONFIG_PATH=~/dev/geOrchestra/superset-core/config/superset_georchestra_config.py
# Serve Superset under the /superset subpath
export SUPERSET_APP_ROOT=/superset
Run setup
Using the CLI
Run the dependencies
We need db and redis dependencies. Running them with docker is probably the simplest:
docker compose up -d db redis
docker compose logs -f
If you haven't yet initialized the DB (needs to be done the first time only), you can run:
(run those in the terminal where you have exported the environment variables above)
# Create an admin user in your metadata database
superset db upgrade
superset fab create-admin

# Load some data to play with(option)
superset load_examples

# Import Guest_template role
superset fab import-roles -p config/georchestra_custom_roles.json

#Create default roles and permissions
superset init
Run Superset
Then, still on the CLI:
# Make the header config file available
wget -O superset/static/assets/header-config.json  https://raw.githubusercontent.com/georchestra/superset/refs/heads/main/extras/header-config.json

# Start the dev server
superset run -p 8088 --with-threads --reload --debugger --debug

# Alternative ways to run the server
# export FLASK_APP="superset:create_app(superset_app_root='/superset')"
# flask run -p 8088 -h 0.0.0.0
# or
# flask --app "superset.app:create_app(superset_app_root='/superset')" run -p 8088 -h 0.0.0.0
Prod-like run
In production, you would rather serve Superset on a production-ready engine, like gunicorn:
pip install gevent gunicorn

gunicorn -w 5 \
-k gevent \
--worker-connections 1000 \
--timeout 120 \
-b  0.0.0.0:8088 \
--limit-request-line 0 \
--limit-request-field_size 0 \
"superset.app:create_app(superset_app_root='/superset')"
PyCharm
If not created from the commandline, create the virtual env and install the dependencies (cf CLI setup).
Here's a working run configuration (sets an app prefix of /superset):
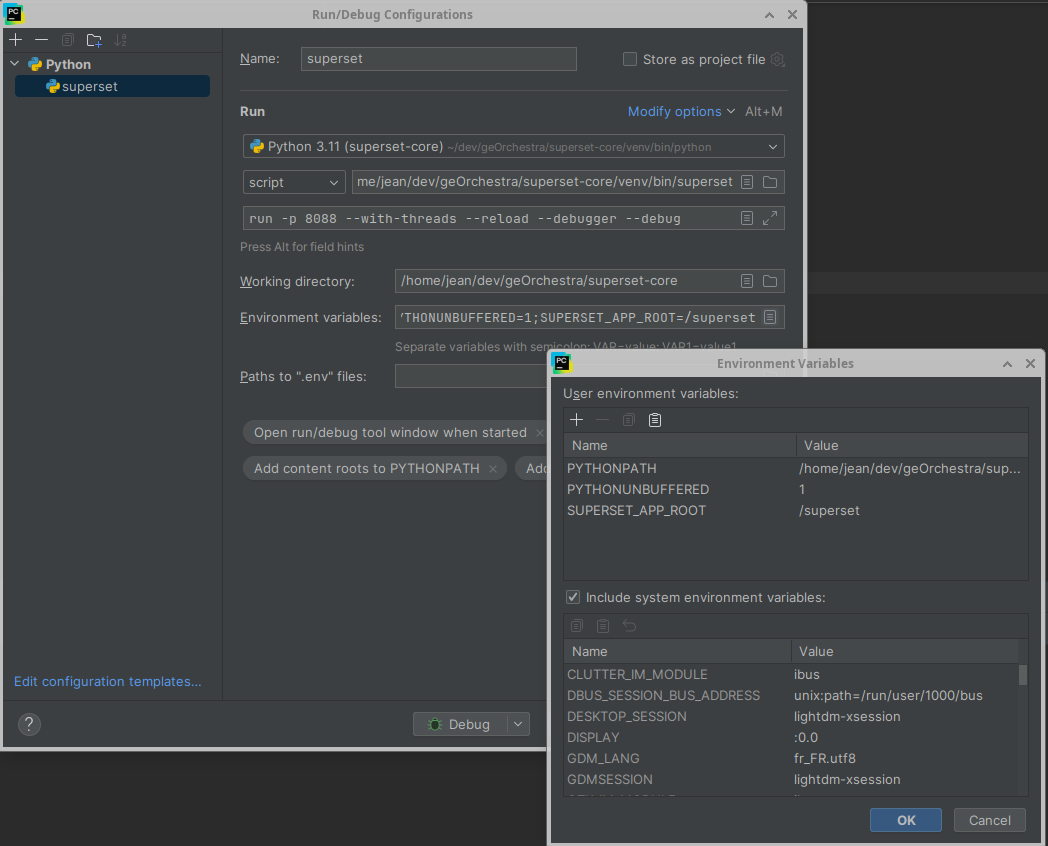
Superset will be available under http://127.0.0.1:8088/superset
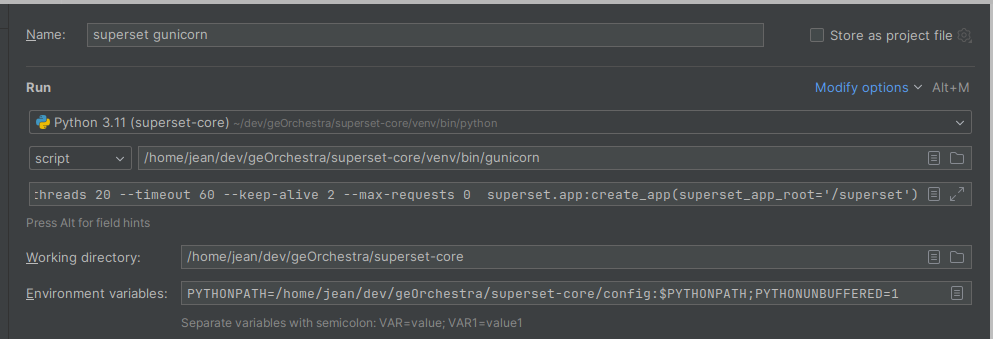
And another config to run with gunicorn
Docker-compose only
I don't really understand their docker-compo setup for dev, so I prefer to work CLI/Pycharm when developing.
To run the full docker compo stack, I'm usually going with the docker-compose-image-tag.yml file and change the tag with a geOrchestra one:
# Set the /superset path prefix
cat > docker/.env-local <<EOL
SUPERSET_APP_ROOT="/superset"
# Add here you custom env vars
EOL

# Customize the docker image, use the georchestra one
sed -i "s|^x-superset-image: .*|x-superset-image: \&superset-image georchestra/superset:latest|" docker-compose-image-tag.yml

docker compose -f docker-compose-image-tag.yml up -d
If you want to use the georchestra custom config, you'll have to add them in the docker/pythonpath_dev. The config entrypoint has to be named docker/pythonpath_dev/superset_config_local.py
Testing authentication/identification and roles
The main point of the geOrchestra integration of Superset is to use geOrchestra's way of managing the users, i.e. the Gateway passing on the user-related information through HTTP headers.
Expected headers
When a user is logged in the platform, the Gateway passes a bunch of HTTP headers to the registered apps. The precise list of headers depends on the configuration on the gateway. For Superset, several of them are expected, as mentioned in the doc:
sec-usernamesec-rolessec-emailsec-firstnamesec-lastname
Headers' names when working on the python code
When those headers are passed on to the Superset app, the name under which Superset will read them is slightly different. They will be called HTTP_SEC_USERNAME, HTTP_SEC_ROLES, HTTP_SEC_EMAIL, HTTP_SEC_FIRSTNAME, HTTP_SEC_LASTNAME.
Setting those headers
Several browser extensions allow a developer to set some HTTP headers. This will allow you to simulate the behaviour of the Gateway and prevent you from having to set up a complex environment with Gateway & all. For instance Simple Modify Headers.
Use one of those to set the heades listed above (sec-username etc).
Roles
The main point of setting the headers is to simulate a user being logged in.
As explained in the administration doc, giving in the console the role SUPERSET_WHATEVER to a user will give it, in Superset, the Whatever role (case insensitive), supposing this role is defined in Superset.
For instance SUPERSET_ADMIN to make a user Admin in Superset.
The thing is, the Gateway actually renames a bit the roles when it passes them on. SUPERSET_WHATEVER actually becomes ROLE_SUPERSET_WHATEVER in the sec-roles header. So, if you want your user to be admin in Superset, give him the ROLE_SUPERSET_ADMIN in his sec-roles HTTP header. Only roles following the pattern ROLE_SUPERSET_* have a chance of working. Supposing they match (case-insensitively) a corresponding role in Superset itself.